Apatosaurus Brontosaurus Dinosaur -->

Wednesday 28 September 2016

Primary Research into Film Posters


Primary Research

Poster: Blair Witch
Location: Odeon
Fonts: Serif, All Caps, Formal, Loose Tracking
Colours: Red & Black
Size: Quad
Economic: 2 Colours used, no shading
Constituent Elements: Symbolism, Slogan, Release date, Production company, Social medias
Style: Minimalistic, connotes evil
Artistic/Commercial: 30% commercial, 70% artistic
Target Audience: Under 25 as it is a horror film


Poster: Captain Fantastic
Location: Little Theatre Cinema
Title Font: Mix of serif and sans serif fonts in all caps
Other Fonts: Sans serif, capitalised, quotes in italics
Colours: Pastel colours and natrual aqua colours
Size: Quad
Economic: No, a range of colours with an image included
Constituent Elements: Presents main characters, looking at camera to create intimacy with viewer, Reviews, Star actors name
Style: Minimalistic, eye grabbing
Artistic/Commercial: 50/50
Target Audience: Appeals to all four quadrants

From this research I had a go at designing my own poster for Spirited Away:
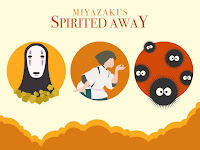


Reflection on my poster design

To make this poster I used the Ellipse tool to make the clouds at the bottom of the poster and the circles, as well as the eyes for the soot creatures. Other shape tools I used are the Polygon Tool for the gold and the Rectangle Tool for the background. I had to research how to make a star shape in photoshop to draw the soot creatures, and I sourced the other characters from the internet, which I would draw myself if I had enough time. Lastly I used the text tool for the title.

In the original poster I made, it didn't look that effective to me because the colours didn't follow a specific scheme. Therefore the poster wasn't eye catching and looked jumbled. The posters I researched both had a specific colour scheme to give a certain mood/atmosphere e.g. Blair Witch was red and black for horror, so I decided to change the colours of my poster. 

I updated my poster with an orange and red colour scheme, to connote nature and warmness. It also made the poster more visually appealing. Overall I think the poster is effective and it shows the title & director which stand out, however it is missing out a lot of common features usually seen on posters that I listed in my research. Firstly it doesn't have credits at the bottom which are evident on all real film posters. I could've extended the bottom of this poster to make space for credits. Another feature missing is reviews and ratings which help to make the film more desirable to an audience. Lastly, to make the poster more realistic I could add production company logos and additional information about the film. This would make it's appearance more legitimate and professional looking. I left out the log-line and release date as I wanted to keep the posters minimalistic look.

For my next design, I aim to add all of the features which I missed out this time, especially a credits block at the bottom as this helps the poster to look real. I'm also going to make sure I add a release date as this is necessary for all films.

How can Photoshop be used effectively to manipulate images?

Photoshop is a versatile program with a wide range of tools and functions that can be used to subtly alter or completely change and composite images.

One way that photoshop can manipulate an image is by using the liquify filter. By selecting this filter your image opens in a new window with the ability to be altered with a range of liquify tools. There are 5 in total and they all alter the structure of the image. From top to bottom there are:

Forward Warp Tool
-Moves pixels forward by dragging the mouse, which distorts the image and makes it look smudged

-The brush size, pressure and density can be changed in the tool options window, which alter how many pixels are moved

Reconstruct Tool
-Reverses manipulations made using the forward warp tool

Pucker Tool
-Squeezes pixels towards the centre of the brush
-Brush size and pressure can be changed

Bloat Tool
-Pushes pixels outward towards the edges of the brush area
-Brush size and pressure can be changed

Push Tool
-Pushes pixels to the left/right depending on which way you drag
-Can be moved around an object clockwise/anti-clockwise to increase/decrease it's size

These tools all have different uses but most wouldn't be used professionally. The forward warp tool can be used to edit how someone looks in an image as an alternative to plastic surgery (e.g. it can change how wide someones belly or leg is, the shape of someones nose, if someone's smiling etc). The pucker and bloat tool can also be used for the same job.


These tools can also help to make images or shapes look abstract so would be useful to an artist or graphic designer.

Sound in Film

Sound plays a big part in making a film good, and it helps towards setting the mood of a scene, adding punch to visuals, telling a story and putting the film in a certain era or timeframe.

In early cinema, silent films had music that was played live alongside the film, in order to make the visuals more entertaining and have context. In modern cinema not only music but a range of sound is used to tell a story. Compared to early cinema, modern films are a lot more effective in telling stories and portraying emotion because of the developments in technology allowing use of dialogue, sound effects and music timed with the visuals. (Not to mention advancement in cameras and editing). I am going to analyse this clip from stand by me and list how the sound is effective in setting the scene:

In this scene the sound helps towards creating an atmosphere and brings together the mise en scène. At the beginning of the scene only background ambience can be heard (birds, water and wind) along with the footsteps of a character, isolating them and bringing attention to them. It helps to connote the serenity but this calmness is juxtaposed by the first piece of dialogue heard; shouting.

The sound of the train is quiet but gets progressively louder as the tension of the scene increases. The ambient sound gets quieter to bring attention to the train and the action taking place. As the train is coming towards them, the shot changes between a close up and long shot, which contrasts between intensity and normality. The shouting and screaming boys contribute to the hectic mood and as they escape the train, the tension goes back down to normal and the scene gets quieter once again. Therefore in this scene the train acts as a dramatic device to adapt the tension, and the unpleasant loud noise it's making helps with this.

Peer Assessment

Why do we do peer assessments?

We peer assess each others work which involves giving constructive criticism in order to help each other improve. By giving an opinion about a peer's work, you can identify any problems you thought you saw, and give them a review from a different persons perspective as people see things differently.
The peer assessment can help the individual being assessed to improve and try new things, suggested by a peer.

Today I peer assessed Curtis's Silent Film: "The Thief"


It is a very funny short film which contains some great use of slapstick comedy, a common convention of silent films. Some points I identified to improve on were the titles, as the font used isn't that old looking and as it is the first thing the viewer sees, it needs to set the tone of the film. Another point is that there is a moment at around 10 seconds in where the shot changes to a close up which is at an angle. This doesn't follow the style of silent film as all shots were medium/long and completely flat. Lastly, there are no text frames to show dialogue, which can help to put across the story better.

Overall, I thought this was a brilliant attempt at a silent film, following most of the codes and conventions commonly seen in old pieces. It had good acting and slapstick comedy, a fitting soundtrack and was of course in black and white.

Thursday 22 September 2016

Me in 60 Seconds

Research

Here is an example of a video filmed in widescreen:

A dramatic effect is presented by this wide format, as it has the ability to show a lot in frame, and this makes scenes appear to be dramatic. Although it looks impressive, this is a very common format of film and most videos today are filmed like this. For my project I'd like to make something different which stands out and can be viewed on both mobile and computers, so I looked at other formats and found some portrait video on Instagram:

After researching, I’ve chosen to make my film in 1:1 ratio (square) for both mobile and online viewing. This ratio will help frame faces and objects with no other distractions, forming some intimacy/connection with the viewer. One example of this format is Xavier Dolan’s “Mommy”. This square format looks unique so the video will stand out.

My video is going to be around 60 seconds long, and will be a photomation (sequence of photographs) with titles and colours/editing added. As I won't be narrating it with my voice, I'll use text to narrate the video.

It will consist of some skateboarding, certain music/films I like, my friends and family, pets, travel and photos I've taken. As I want it to represent me, I will be shooting the video in and around my house.

For the sound, I will record some of my own effects but also use royalty free sounds which I'll source online from websites like freesound.org and freesfx.co.uk. In order to not face copyright issues, I'll use this song from soundcloud, which is royalty free. 

Wednesday 21 September 2016

The Importance of Demographics

Demographics are very important as they are a way of categorizing people. These people can provide valuable information about the habits, likes and dislikes of certain ages, genders and groups. Information like this is valuable because it enables us to serve the needs and preferences of our ideal target audience for whatever we're trying to sell.
Concerning research, demographics are also very important because it can help to identify new opportunities. This is because it can show a gap in the market for whatever is being researched, showing what can be done that hasn't yet. This could be a new, innovative product or a gripping new film that appeals to a wide audience.

Investigating type and layout using InDesign

6 Examples of a typeface being used


Typeface vs Font

A typeface is a design for a set of characters. This typeface however can be presented in a wide range of fonts which is how the characters look, be it boldness, italics, wide or thin. Fonts most commonly known are Bold, Regular and Italic, however some others are condensed, making each character thinner and black which makes each character bolder.

Serif vs. Sans Serif

A serif is a dash/line which finishes off the stroke of a letter in a typeface. In French, 'sans' simply means 'without', therefore, if a typeface is sans serif it means it doesn't have strokes or pointy bits on each letter making it look more fancy. The typeface I'm using now is serif. An example of a sans serif typeface is Arial.

Parts of a Typeface


Type Families

Kerning, Tracking and Leading

Kerning is the adjustment of space between two characters in a block of text. It can be done on InDesign by selecting Optical (it defaults to Metric) in the 'Character' window.


Tracking is the adjustment of space between all characters in a block of text. It can be done on InDesign by selecting a number or typing in your own in the tracking section of the Character window.


Leading is the spacing between each line in a block of text. You can change the tracking of a block of text in InDesign by typing in or selecting a number in the Leading section of the Character window.


What is a Grid?

In typography, a grid is a series of intersecting vertical and horizontal lines which help to arrange blocks/lines of text alongside images and other elements to easily organise a piece of work.

To set up a grid using InDesign you click InDesign > Preferences > Grids, then you have to specify the colours, where the grid starts, and the spacing between grid lines.

Making A Silent Film

For this project I was given the task of making a silent film in the style of Charlie Chaplin. Before I started filming me and my team looked at some silent films to identify the common codes and conventions. Some that we listed were:
-Static camera (no movement)
-Medium/Long Shots
-Black and white video
-No dialogue/sound
-Grain, flicker and no point of focus
-Exaggerated movements to make up for the lack of dialogue

After taking note of all of these, we went on to shoot our own silent film, considering the features as we went.

Here is the finished product:


Reflecting on this short video, we could have taken some more consideration into some of the shots used, maybe doing more takes per shot. We could have also planned a story with more depth, so that the video could've ended up being a little longer. On the other hand, I think the editing went really well as I was familiar with Adobe Premiere, so the finish product looked really effective and had the certain look I was going for. 

In future projects I'm going to allocate more time into planning the video so it can have a more entertaining and gripping story and convey the characters to the audience more effectively.

Tuesday 13 September 2016

My First Impressions of the Creative Media Course at Bath College

This week I am starting my first proper week of the Creative Media course at Bath College. The environment is a contrast from repetitive secondary school which I have been attending for the past 5 years. I am pleased to experience a change.

Over these first few weeks we are going to be partaking in lessons which cover a variety of different aspects of media and I'm looking forward to those concerning filmmaking, typography and colour. 

this is a picture I took of my friend standing on a bin